Pi Day Banana Pie

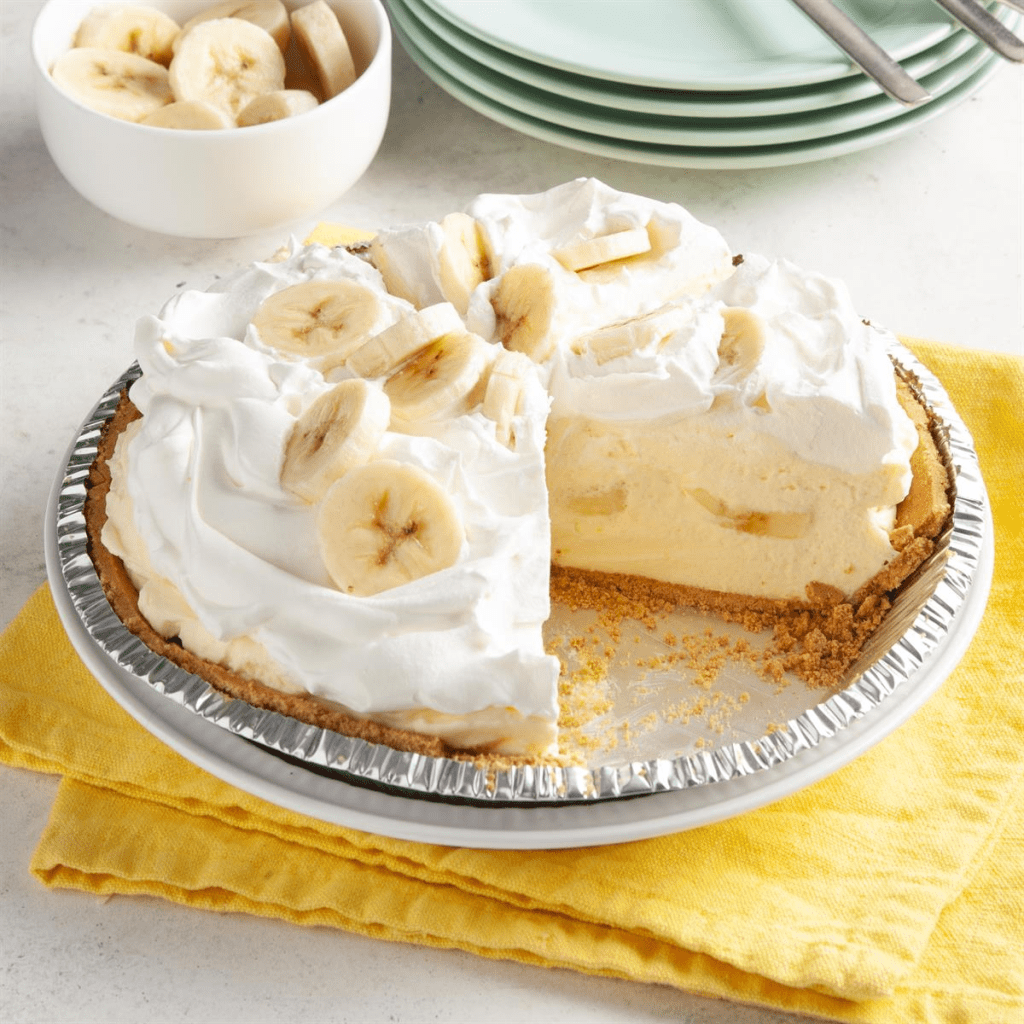
IT’S PI DAY!!! Okay, call me a huge nerd I do not care but pi day is one of my favorite holidays! All the puny pi jokes, plus the association with pi its just a fun unproblematic holiday. One day I was craving banana pudding but as pie so I created a banana pudding pie, let me know if you consider this a pie but it is SOOO GOOD you gotta give it a try! But let’s get to it because I could talk about this for as long as pi…..

Ingredients:

  • Jell-O Pudding (I use vanilla but you can use banana if you want more flavor)
  • Banana’s (Honestly however much you would like I use 3)
  • Nilla Wafers (Nilla Wafers are not vegan but trader joes and whole food brand vanilla wafers’ ingredients do not include eggs or milk products)
  • Vegan Butter
  • Whipped or Meringue Topping (They sell vegan coconut whipped cream, I personally do not like it so I use vegan meringue)
    • For Meringue Topping:
      • Can of Chickpeas
      • Sugar
      • Vanilla
      • Cream of Tar Tar
      • Xanthum Gum (optional)

Now Let’s Get Cooking:

  1. Put 2 cups of nilla wafers and 2 tbsp of sugar(optional) into a blender or food processors (or honestly a bag and go to town) you should have a course ground crumb.
  2. Mix with melted butter and mold into your pie pan and bake at 350 degrees Fahrenheit until baked (10 mins) take out and let cool
  3. Make putting according to package.
  4. Chop Bananas into pennies.
  5. (If you are using whipped topping skip this step) Whip chickpea liquid and cream of tar tar in a bowl on medium until it begins to get frothy (1 – 2 mins). Mix in sugar, vanilla and xanthium powder (this is optional but will add more stability).
  6. Put a layer of banana pennies on the pie crust, pour in the pudding, put another layer of banana pennies and top with whipped toping.
  7. If you use whipped topping add bananas to the top and chill in fridge.
  8. If you use the vegan meringue bake until meringue browns and chill in fridge.
  9. Let chill. Cut and Enjoy!


I hope you enjoyed our food blog post. For more content or if you are looking for an event planner check out our social media

Website: lifessweetmoments.com 

Instagram: @sweeteventssweetercoffee

Facebook: Life’s Sweet Moments

Twitter: @LSMEvents


Taco Tuesday: Cauliflower Tacos

On this taco Tuesday series I have done American Tacos, Street Tacos, and this week I wanted to share a veggie/cauliflower taco. It is no surprised that the Midwest has abysmal Mexican/Latin food options and quality, but one of my favorite tacos out here is a basic tacos with cauliflower and broccoli. My coworker and I ordered them on Christmas last year when we had to work 13 hour shifts because we were the only two that was scheduled to work. I love this recipe because it is so simple and quick to make but has such depth of flavor. Now let’s stop talking about it and get cookin!

Ingredients:

  • Cauliflower
  • Broccoli
  • Carrots
  • Onion
  • Pickled Onions
    • We made this in the street taco recipe.
  • Purple Cabbage
  • Avo- Salsa Verde
  • Cilantro
  • Vegan Crema
  • Tortillas
  • Avocado Oil
  • Seasoning
    • Salt, Black Pepper, ground cumin, dried oregano, ground coriander, smoked paprika

Now Let’s Get Cooking:

  1. Wash and roughly chop all your veggies, add to a large bowl mix oil and seasoning and put on a large baking tray and bake till tender.
  2. Put veggies in tortilla, top with cabbage, cilantro, salsa, and creme. Serve and Enjoy!


I hope you enjoyed our food blog post. For more content or if you are looking for an event planner check out our social media

Website: lifessweetmoments.com 

Instagram: @sweeteventssweetercoffee

Facebook: Life’s Sweet Moments

Twitter: @LSMEvents


Taco Tuesdays: Street Tacos

Last taco Tuesday I did a basic american veggie taco recipe. This Tuesday I wanted to share a vegan carnitas street taco recipe. Some of my favorite memories is grabbing tacos in Santa Ana at 2 am with friends. We went to this family owned shop that was open from like 5pm to 5am and one of my friend groups went so often they’d expect us and have our usual ready. Some of the best street tacos and quesadillas my friend would always get the carnitas (mexican pulled pork) tacos and drink the salsa verde like shots. Even thinking of the food puts a smile on my face with fond memories. When I saw Sorted Food post a video with their version of a pulled mushroom taco I knew I had to put my own twist on it. As always let’s stop talking about it and just get too it.

Ingredients:

  • 2 Onions
    • both red and regular (white, yellow??)
  • 1 cup Apple Cider Vinegar
  • 2 tbsp Honey
  • King Oyster Mushrooms
    • You can use almost any type of mushrooms oyster mushrooms has the most comparable texture to pulled pork.
  • Avocado Oil
  • Garlic
  • Fresh Coriander
  • Tomato Paste
  • Chili Paste
    • If I do not have chili paste I will use chili powder, I have never noticed a huge difference.
  • Vegetable Stock
  • Avo- Salsa Verde
  • Lime
  • Corn Tortillas
  • Seasoning
    • Salt, Black Pepper, ground cumin, dried oregano, ground coriander, smoked paprika

Let’s Get Cookin’! :

  1. Pickled Onions: On the stove or in the microwaves warm up apple cider vinegar, salt and honey. Cut up red onion into thin slices put in a mason jar, add boiling liquid and close. Let sit in fridge for at least 30 mins.
  2. Dice up onion, fresh coriander and garlic. Cut the tops off the mushrooms and cut into thin strips, then use a fork to shred the stems.
  3. Saute onion in the pan until soft and lightly browned. Once browned add in seasoning, tomato and chili paste.
  4. Stir in the mushrooms coating them thoroughly and then add in about 1/4th cup of vegetable stock. Let cook until the majority of the liquid is absorbed.
  5. Let the mixture cool down.
    1. I would suggest cooking doing all the previous steps the night prior. But if not it is okay just give the mushrooms about 5 mins to cool down and they will still be so delicious!
  6. Bake mushrooms in oven for about 15 mins or until it is browned to your preference.
  7. Put mushrooms in tortillas. Dress with pickled onions fresh coriander salsa and lime. Serve and Enjoy!


I hope you enjoyed our food blog post. For more content or if you are looking for an event planner check out our social media

Website: lifessweetmoments.com 

Instagram: @sweeteventssweetercoffee

Facebook: Life’s Sweet Moments

Twitter: @LSMEvents


Vegan Mexican- Style Crema

One of the hardest things for me to be vegan has always been cheese but also sometimes I really crave crema on my tacos. But since I found out how to make it vegan its the best thing ever, and it is so customizable. Let’s stop talking and just get to it.

Ingredients:

  • 1 Cup nut of your choice
    • I prefer to use cashews but will sometimes switch it up and use almonds. Just make sure to blanch or soak your nuts.
  • 1/4 cup of lime juice
  • 1/4 cup cilantro
  • Onion Powder
  • Garlic
  • Jalapeño
  • 1/2 cup Water
  • Salt and Pepper

Let’s Get Mix’n:

  1. Blend all your ingredients until you get the taste and consistency you desire.
  2. Store. Serve and Enjoy!


I hope you enjoyed our food blog post. For more content or if you are looking for an event planner check out our social media

Website: lifessweetmoments.com 

Instagram: @sweeteventssweetercoffee

Facebook: Life’s Sweet Moments

Twitter: @LSMEvents


Taco Tuesday: American Tacos

HOCKEY IS BACK!!! I am so excited and you may be asking yourself: “What in the world does hockey have to do with a food blog or tacos?” Well chef made tacos or some sort of burrito bowl every Tuesday and when there was a home game he would make a taco bar for us that had to work ticketing game events. Me being the superstitious person I am then had to have some sort of taco or rice or something even if it was just eating broccoli and carrots while watching the game or on game days. The thing I love about American tacos is it’s perfect for vegans and vegetarians because it is simply lettuce and tomatoes and onions in a tortilla shell. For the purpose of a food blog I wanted to share a corn and flour tortilla recipe to take your american taco to the next level. As always let’s stop talking about it and get cooking!!

Ingredients:

  • 2 cups Corn Mesa Flour
  • 2 cups All Purpose flour
  • Salt
  • 3 table spoons Olive Oil
  • Water
  • Avocado
  • Lettuce
  • Tomato
  • Onion
  • Salsa Verde

Let’s Get Cookin’:

  1. Make the tortillas:
    1. For the corn tortilla whisk corn mesa flour and salt together then gradually add in 2 cups of hot water till dough forms. Once you have a good dough put in bowl and cover with dish towel to rest for at least 10 mins.
    2. You are going to do the same thing with your flour tortilla except adding in the olive oil in with the water and let rest.
    3. Once rest potion out the dough and press.
      1. You can use either a tortilla press or two heavy cutting boards to press out your tortillas into a circle.
    4. Cook in pan for 40 seconds per side
  2. Top your tortillas with your lettuce, onion, tomato and salsa. Serve. and Enjoy!


I hope you enjoyed our food blog post. For more content or if you are looking for an event planner check out our social media

Website: lifessweetmoments.com 

Instagram: @sweeteventssweetercoffee

Facebook: Life’s Sweet Moments

Twitter: @LSMEvents


Avo Edamame Gyoza

I grew up in the Midwest, moved out to California for a few years then back to the Midwest. One of the things I miss most about California is the diversity in food, some of the best Asian/ Mexican/ vegan food came from the west coast. In the Midwest finding these cuisines are so difficult. One of my favorite things were edamame Gyoza, which is a sort of Japanese pot stickers. My best friend and I would have movie nights where we order a bunch of Thai, Japanese, and Vietnamese food and just have girls night. I obviously had to make my own recipe to recreate here and remind me of great times. Let’s stop talking about it and just get to it!

Ingredients:

  • 1 small onion, diced
  • 1 Tbs pickled ginger
  • 2-3 cloves garlic, grated
  • 1/2 Avocado
  • 1 cup edamame
    • I live somewhere where fresh edamame is not easy to find, I normally go to HMART but frozen edamame works just as good just let it defrost first.
  • Crimini mushrooms
    • Dice super small
  • Olive oil
  • 4 basil leaves
    • Slice these into thin strips
  • 1 tsp toasted sesame oil
    • Near me this can be kind of pricey if you can not get your hands on the oil I use a few toasted sesame seeds, they were cheaper and strong in flavor so use sparingly.
  • Seasoning:
    • 1 tsp Smoked Paprika
    • 1/4 Cayenne Pepper
      • I am not a fan of spicy stuff so I put a little less of this.
    • Sea Salt
    • Black Pepper
  • Gyoza Dipping sauce
  • 15-20 wanton wrappers
    • I use Nasoya rounds because it is plant based and super easy to make the gyoza

Now Let’s Get Cookin’

  1. Cook onion, garlic, ginger, and mushrooms in olive oil until soft but not browned. Once Soft add in the edamame.
  2. Put all the ingredients in a bowl and mash with a fork until a course filling.
    1. I like to leave edamame a little intact to add some texture.
  3. Get a small cup of water and wanton wrappers. put a little filling in the middle of each wrapper and use water on your fingers to pinch the wrapper together to close.
  4. Using the pan from earlier make sure there is no leftover food and add more olive oil.
  5. Place your dumplings in the pan not touching and cook till bottoms are brown. Add about a cup of water (Just enough to cover the bottom of the pan) let steam for about 1-2 mins.
  6. Serve with dipping sauce or soy sauce and Enjoy!


I hope you enjoyed our food blog post. For more content or if you are looking for an event planner check out our social media

Website: lifessweetmoments.com 

Instagram: @sweeteventssweetercoffee

Facebook: Life’s Sweet Moments

Twitter: @LSMEvents


Lauren’s Lunch Quesadillas

I love quesadillas they are quick and easy to make and really filling. The best thing about quesadillas is they can be customized in so many ways and have so many great ingredients. When I was in Spain I had a quesadilla with chickpeas, tomatoes, and other vegetables, with home made tortillas. It was the first time I had a quesadilla other than the Americanized flour tortilla and “Mexican style cheese” from the grocery store. Since then whenever I made tortillas I always experimented with what I wanted in it, and this recipe is my favorite way to eat quesadillas. Also quick disclaimer this is not a traditional Mexican nor Spanish dish, this is a me dish so do not come for me for this not being authentic. Let’s stop talking about it and just get to it.

Ingredients:

  • Tortillas
    • I highly suggest you make your own tortillas, I often use this Vegan Spinach Tortilla recipe. But play around with it and you find a great one you love.
  • Corn
    • I prefer fresh corn de-cobbed (not a word I know but you know what I mean) , but honestly any corn will work.
  • Black Beans
    • For this dish I use canned beans if I do not have any already made, its just that I do not use many so not worth going through the process of soaking and cooking dried beans.
  • Cheese
    • I like to shred up some Manchego cheese but honestly any of your favorite cheese will work.
  • Jalapenos
    • The fresh ones not the jarred or canned ones. You only need one or two depending on how spicy you it. It’s way cheaper if you are like me and do not use jalapenos that often.
    • Dice them up kinda small
  • Red Onion
    • Diced
  • Limes
  • Romaine Lettuce
    • Roughly Chopped
  • Cilantro
    • Roughly Chopped
  • Salsa Verde
  • Chile Powder
  • Black Pepper
  • Oil

Let’s Get Cookin’!

  1. Make the tortillas, salsa, and black beans.
    1. I suggest if you are making all of these from scratch to make the night before as it will all keep and you can use these things for other dishes!
  2. Chop up and prep all your veggies.
  3. Roughly mash the black beans in a bowl and fold in the cheese to make a sort of paste.
  4. In a separate bowl mix together your corn, jalapenos, cilantro, onions, juice from half of your lime, salt, pepper, and chili powder to taste.
  5. Oil your pan, and lay your tortilla on it on medium heat.
  6. Spread your bean paste then top with corn mixture and a little more cheese. Fold over and cook till golden on both sides.
  7. Top quesadilla with lettuce and avo-salsa. Serve. Enjoy!


I hope you enjoyed our food blog post. For more content or if you are looking for an event planner check out our social media

Website: lifessweetmoments.com 

Instagram: @sweeteventssweetercoffee

Facebook: Life’s Sweet Moments

Twitter: @LSMEvents


Better than Bella’s Mushroom Ravioli

Stephanie Meyer is releasing the full version of her book Midnight Sun which is Edward’s POV from Twilight. It is bringing back all the adolescence memories of being obsessed with the Twilight books and movies. Once my mom even took me to the final movie premier but it was a marathon of all the movies with fun trivia in between the movies. It was such a great time In the first book when Bella found out Edward was vampire they were at this Italian restaurant and he ordered her mushroom ravioli and like the entire scene was based around her eating it that it even made it into the movie. I never thought too much about this detail until now where there are a ton of memes about this ravioli, so why not post my version of this ravioli dish. Well as always lets stop talking about it and just get to it!

Ingredients:

  • Ravioli
  • Pasta
    • 1 Tsp of Avocado Oil
    • 2 Cups of Flour
      • I just use all purpose flour but you can use almost any kind depending on your diet
    • 1/2 Cup of Water
      • Make sure it is lukewarm
    • Salt
      • 1 tsp for the dough and a bunch for the boiling water
  • Filling
    • Ricotta Cheese
      • To make this vegan you can use cream cheese. Daiya is a great brand. This creamy textured cheese will help bind together your filling.
    • Mozzarella Cheese
    • Parmesan Cheese
    • Basil
    • Parsley
    • Oregano
    • 1 clove of garlic minced
    • Mushrooms
      • Any type you like just make sure to mince it up really small.
    • Salt
    • Pepper
  • Sauce
    • 4 Tbsp of Oil
    • 1/4th Cup Sun-Dried Tomatoes
      • Make sure to roughly chop them.
    • Mushrooms
      • As much of any type of mushroom you like you can dice them or slice them up how ever you like to eat them.
    • Spinach
      • As much of spinach as you like. I like to do maybe 2 or 3 handfuls, just remember that they will cook down.
    • 6 cloves of garlic minced, or 6 tsp of jarred minced garlic
      • I like garlic so I add more I would say add 3 cloves or tsp then add as you taste it if you do not like garlic that much.
    • Red Pepper Flakes
    • Salt
    • Black Pepper

Now Let’s Get Cook’n:

  1. Make your filling. Combine all the ingredients for the filling in a bowl fold together and let chill out in the fridge.
  2. Make your pasta. Sift flour and salt together onto work space. Make a well in the middle of the flour and pour in water and fold till you get a dough.
  3. Roll out with a floured rolling pin (Wine bottles or glass jars work too as long as it is cleaned and roll out the dough. *Make sure it is thin but not too then like normal pasta thickness*
    1. I like to do one long rectangle and then cut it in half for the top and bottom of the raviolis but you can separate the dough out into two equal parts and roll out 2 rectangles that way. Whatever is easiest for you
  4. Make the Ravioli. Spoon little balls of your filling about 1 to 2 inches apart on your first pasta sheet. Cover with the second cut and pinch the sides with a fork or your thumbs.
    1. I like to pop them in the freezer after this while I get my water to boiling.
  5. Make sea water with a touch of oil. Throw your raviolis in and let boil for like 3-5 mins.
    1. I cook them a little under because they will cook again in the sauce and I do not care for mushy pasta.
  6. Make the Sauce. Put garlic, mushrooms, tomatoes and pasta in an oiled pan (Using 2 tsp of oil). Cook off till mushrooms are almost tender, add in seasoning, spinach and a little water. Cover and let cook till spinach wilts.
  7. Dress with fresh parsley and Parmesan. Serve. and Enjoy!


I hope you enjoyed our food blog post. For more content or if you are looking for an event planner check out our social media

Website: lifessweetmoments.com 

Instagram: @sweeteventssweetercoffee

Facebook: Life’s Sweet Moments

Twitter: @LSMEvents


Blueberry Muffins, but Make ’em Vegan

Everyone has been making banana bread for some reason, but I was craving blueberry Muffins and had extra bananas. They are so soft and moist but also so flavorful. Muffins are a great baked good to make for breakfast because you can make a bunch and they keep for a while. They are also quick to make in college I would whip these up the night before I had to work at 4am and put them in containers for the day. The best part of this recipe is you can sub out ingredients to fit several types of diets. Okay, let’s stop talking about it and get to it!

Ingredients:

  • 2 cups Flour 
    • You can use any type of flour, so experiment if you want to make it gluten free or whatever.
  • 2.5 tsp Baking Powder
  • 3/4 cup Sugar
  • 1/2 tsp Salt
  • 1 cup Milk
    • I recently got into cashew milk but any milk works and you can even make your own milk.
  • 1/3 cup Olive Oil
    • Play around with the type of oil you use, for more flavor you can use fruit infused oil.
  • 1 tsp Vanilla Extract
  • 2 Bananas- Mashed
  • 2 cups Blueberries
    • fresh, canned or frozen works.

Now Let’s Get Bake’n:

  1. Preheat oven to 350 degrees. Then prep your cupcake/muffin pan with either baking cups or greasing it.
    1. If you do use baking cups I suggest using silicone cups better for the environment plus cheaper.
  2. Whisk together all ingredients except for the blueberries. Once mixture is smooth stir in blueberries gently.
  3. Bake. Cool. and Enjoy!


I hope you enjoyed our food blog post. For more content or if you are looking for an event planner check out our social media

Website: lifessweetmoments.com 

Instagram: @sweeteventssweetercoffee

Facebook: Life’s Sweet Moments

Twitter: @LSMEvents


Cheesy Cauliflower Pizza

I am surprised this is my first pizza recipe, because I love pizza so much. This is a tasty and a low gluten recipe. I was going to do a vegan version but in all honesty this isn’t a recipe or even a cooking blog it is a food blog. It is all the foods I enjoy eating and how I make them. This is also a more complex recipe than what I normally post because it will have recipes for the crust, and sauce. Even with the recipe being more involved it is still a relatively simple and quick dish. But lets stop talking about it and get right to it!

Ingredients:

  • Crust
    • 1 head of cauliflower
    • 1 egg
    • 2 tsp of Parmesan cheese
    • 1/2 cup of shredded mozzarella cheese
    • 1 tbsp Italian Seasoning
    • black pepper to taste
  • Sauce
    • 1/4 cup of Extra Virgin Olive Oil
    • 3 garlic cloves
    • 1 tbsp of tomato paste
    • 1 can of whole peeled Italian tomatoes
    • 3 basil sprigs
    • Sugar
      • I like my sauce sweeter so I use a little more but use as needed
    • Salt and pepper to taste
  • Toppings
    • Parmesan cheese
    • Mozzarella Cheese
    • Ovalini Cheese
    • Red Onion
    • Mushrooms
    • Basil

Now Let’s Get Cooking:

  1. Prep, cut all your veggies and cheese line your baking sheet and preheat oven to 425 degrees F.
  2. Crust: Add cauliflower to the bowl of a food processor and pulse until finely ground
    1. Or if you are like me and do not have food processor chop the cauliflower finely and put in the the blinder till finely ground.
  3. Sauce: In a large saucepan, heat the extra-virgin olive oil. Add the garlic cloves and cook over moderate heat, stirring occasionally
  4. Crust: While your garlic is cooking microwave your ground cauliflower for 4-5 mins then set to the side to cool.
  5. Sauce: Add the tomato paste to the garlic and let cook for a minute then add in the tomato and crush them with your stirring spoon. Add in all your spices and sugar to taste and bring to a boil. Once its at a boil let simmer for 30 mins.
  6. Crust: Once your sauce is simmering take a cheese cloth and drain as much liquid out of the cauliflower as possible.
    1. Once again if you are like me with no cheese cloth just use a clean dish cloth and it works just as well.
  7. Crust: Put cauliflower to a large bowl with eggs, mozzarella, Parmesan, Italian seasoning, salt and pepper.
  8. Crust: Spread cauliflower mixture onto a baking sheet. brush with oil and bake for 12-15 minutes, or until golden.
  9. Sauce: Discard garlic cloves and basil sprigs.
  10. Top with pizza sauce, and toppings. Place into oven and bake until the cheese has melted and starts to brown.
  11. Finish with basil, crushed red pepper, Serve, and Enjoy!

I hope you enjoyed our food blog post. For more content or if you are looking for an event planner check out our social media

Website: lifessweetmoments.com 

Instagram: @sweeteventssweetercoffee

Facebook: Life’s Sweet Moments

Twitter: @LSMEvents


Design a site like this with WordPress.com
Get started